Monday, 29 September 2014

Key Lime Pie


Hi everyone and happy Monday!

Today I am going to share a dessert recipe with you: Key Lime Pie.

I wish I had tried this recipe over the summer as it would have been lovely after a BBQ.  It's really fresh and creamy and great if you want to impress your friends and family without spending hours in the kitchen. 

It will have to set in the fridge for a few hours and even better overnight, so there's no last minute preparation! What more can you ask for?!


There it is:


INGREDIENTS: Serves 10 people. 5 syns per slice
  • 8 digestive biscuits
  • 50 gr low fat spread
  • 1 sachet sugar free lemon and lime jelly
  • 250 gr quark
  • 2 x 175 gr muller light vanilla yoghurt
  • a few drops of green food colouring
  • zest of 2 limes plus the juice of 4 limes
  • 2 tsp powdered gelatine
  • 3 tbsp sweetener


METHOD


  • Make up the jelly with 150 ml of boiled water and let cool.  Add the powdered gelatine.
  • Crumble the digestive biscuits and mix with the melted low fat spread. 
  • Press this mixture very tight with the back of a spoon at the bottom of a 20cm springform baking tray.
  • In a blender mix the quark cheese, 2 muller light, the juice of 4 limes, the zest of 2 limes, and the food colouring.
  • Mix in the jelly when is completely cold and pour the whole mixture over the base.
  • Let it set overnight in the fridge and enjoy.


Send me some pics if you make it. I would love to see them!! :-)


xoxo


Thursday, 25 September 2014

Pizza Topped Chicken

Whenever I feel like having something really tasty and don't have too much time to spend in the kitchen, the pizza topped chicken is one of my options.  
I love the sweetness of the sauce, and what to say about the cheese: I adore cheese!

I usually use the low fat cheese and count it as my HEA so that the whole recipe is syn free.

This is how I make it:


INGREDIENTS: (syn free if using cheese as HEA)
serves 4


  • 4 chicken breasts
  • 1 red pepper (finely chopped)
  • 1 small onion (finely chopped)
  • 2 cloves of garlic (crushed)
  • half a tin of chopped tomatoes
  • 1 tbsp tomato puree
  • 1 and 1/2 tsp oregano
  • 50 ml of stock
  • 160 gr low fat cheese


METHOD:

  • Spray a saucepan with frylight and sautee the pepper, onion and garlic for a few minutes.
  • Add the chopped tomatoes, the tomato puree, oregano, stock and simmer for a few minutes.
  • Spray a pan with Frylight, butterfly the chicken breast and fry till it gets a bit of colour on both sides.
  • Place the chicken breast in an oven proof tray, top it with the sauce and put cheese on top.
  • Cook in hot oven at 180 degrees for about 25 mins or till fully cooked and enjoy it with Slimming World chips and a side salad


Have you ever tried it?

Send me pics if you make it.  I would love to hear if you enjoyed it xoxo


Monday, 22 September 2014

Bowtie pasta with mushrooms and sundried tomatoes

Today's recipe is a very easy and quick one.  It's a dish that you get ready in matter of minutes: bowtie pasta with mushrooms and sundried tomatoes. 
As some of you may already know, pasta is always a big hit with my family and I absolutely love it when I think of a recipe that is so simple to make :-)


INGREDIENTS
Serves 4 (1 syn per serving if using the cheese as part of your HEA)


  • 350 gr bowtie pasta
  • 1 clove garlic
  • 1 medium onion
  • 50 gr porcini mushrooms
  • 250 gr chestnut mushrooms
  • 100 gr sundried tomatoes (4 syns)
  • 70 gr light philadelphia cheese
  • parsley


METHOD:

  • Soak the sundried tomatoes in warm water for about half an hour.
  • Soak the porcini mushrooms in warm water for a few minutes, drain, chop and keep the water for later.
  • Mince the garlic, dice the onion and slice the chestnut mushrooms.
  • Spray a pan with frylight and add the garlic, onion, mushrooms and sundried tomatoes.
  • In the meantime, boil the pasta in salted hot water and drain.
  • Add the pasta to the pan and stir in the philadelphia cheese, the porcini mushrooms water and make sure it's nice and moist and that the water doesn't dry out completely.
  • Serve immediately and add some parsley on top.


Let me know if you are going to make this recipe and send pics in if you do :-)

xoxo


Friday, 19 September 2014

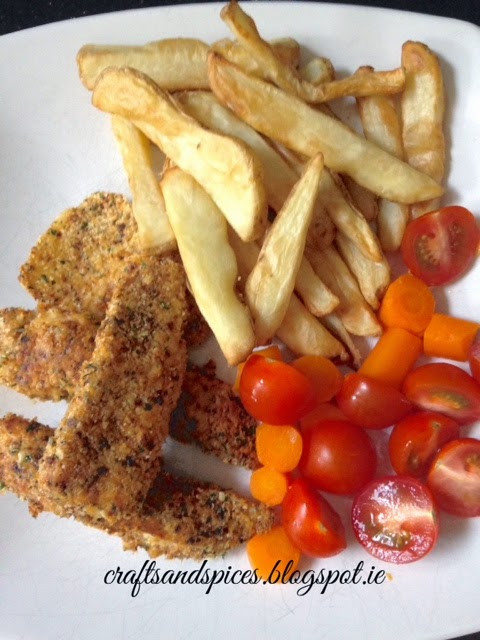
Fakeaway Friday: Fish and Chips

Since I joined Slimming World I learned how to prepare all those takeaway dishes from scratch by using a wide variety of spices.

Fish and chips is one of them, prepared the healthy way of course :-)
I always loved fish and chips but the one you get from the takeaways is so high in calories and fats and if you are trying to lose some weight and eat healthy it's just not worth it :-(

It doesn't take so long to make this healthy version and it can be prepared in the morning and stored in the fridge till you are ready to cook it.  It's also virtually syn free if you use the wholemeal bread as your HEB.

There you go:


INGREDIENTS:  
serves 4 - syn free if using wholemeal bread as HEB


  • 4 cod fillets cut into strips
  • 1 beaten egg
  • 120 gr wholemeal breadcrumbs
  • 1 oxo cube
  • 1 tbsp dried garlic
  • 1 tbsp dried parsley
  • 1/2 tsp paprika


METHOD:


  • Mix the breadcrumbs, oxo cube, garlic, parsley and paprika in a bowl.
  • Dip the fish strip into the beaten egg and then straight into the dry mixture.
  • Make sure the fish is all coated.
  • Spray a pan with Frylight and fry the fish to brown the coating.
  • Transfer into an ovenproof dish and bake in the oven at 180 degrees for approx 20 mins or till fully cooked.
  • Serve with Slimming World chips and a side salad.


It was soooo yummy!
Let me know if you try it and send me some pics.

Have a great weekend everybody!
xoxo


Wednesday, 17 September 2014

Orange Cake with Berries


Today I want to share with you a beautiful cake recipe: Orange Cake with berries.

Perfect ending to a Sunday dinner or whenever you feel like having a special treat, this cake is quite low in syns (3 1/2 per slice) but bursts with flavour.

There it is: :-)

INGREDIENTS: 

Serves 12 - 3 1/2 syns per serving

  • 4 eggs
  • 50 gr caster sugar
  • 150 gr self raising flour
  • 5 tbsp sweetener
  • 1 tsp baking powder
  • juice of 2 oranges
  • 2 tbsp of grated orange zest
  • berries to serve


FOR THE SYRUP
  • juice of 2 oranges
  • 1 tbsp arrowroot
  • zest of 2 oranges 
  • 4 tbsp sweetener
  • 90 ml water


METHOD:

  • Preheat the oven at 190 C and line a 20cm baking tray with parchment paper.
  • Separate the eggs.
  • In a bowl mix until thick the egg yolks, flour, sweetener, sugar, baking powder, juice of 2 oranges, and orange zest.
  • In a separate bowl whisk the egg whites until they are softly peaked.
  • Fold them into the rest of the mixture.
  • Spoon the whole mixture into the baking tray and bake in the oven for approx 25/30 mins or till firm to touch.
  • In the meantime prepare the syrup by placing all the ingredients in a saucepan.
  • Bring to boil and continue whisking till thickened.
  • When the cake is fully cooked leave it to cool down in a wire rack for a few minutes.
  • Drizzle the syrup over, cut into slices and serve with berries


It's a gorgeous gooey cake that explodes with orange flavours.  It would be lovely to serve it with raspberries but I didn't have any at home... one more excuse to make it again :-)


Let me know if you make it and what you think,

Till next time

xoxo


Monday, 15 September 2014

Aveeno Hand Cream Review

When I think of hand cream the one product that comes to my mind is Aveeno Hand Cream.
It's the only cream I've been buying for my hands in the past year. 

My hands crack, bleed and they get very sore in the winter, therefore I have always been looking for a very good product. My local chemist recommended I should try Aveeno Hand Cream.  

I have to say it's one of the best hand cream you can get: my hands felt much smoother right from the first application and what's more it doesn't have that greasy feeling and get absorbed quite quickly.  Also a little bit goes a long way and it definitely lasts through a couple of hand washings, although I 'm not sure it last for the 24 hours. I also love the fact that it's practically scent free because it feels very natural.

I always keep a tub on my bedside table and one in my handbag.  I apply it every night before bed and once more half way through the day if needed. 
It retails at a price of €7.39 in Ireland which is a little bit pricey for 75ml but so worth it!

Definitely one of those products I can't live without...

What do you think?  Have you tried it yet?  Can you recommend other good hand creams?

Till next time lovelies,

xoxo


Wednesday, 10 September 2014

Pop Up Box Card Tutorial

Today I will show you how to make a Pop Up Box Card like this one:


You will need:

  • 12" x 12" cardstock
  • Coordinated patterned papers
  • Acetate (cut into thin strips)
  • Die cuts
  • Scoring board and tool
  • Paper trimmer
  • Double sided tape


First of all trim the cardstock to 23.5cm x 15cm
On the long side score at 5.5cm, 11cm, 16.5.cm and 22cm
Turn it around and score at 7cm


Cut down to the score line right where you had previously score (only 7cm down).
Trim half of the small strip on the side (soon after the 22cm score) and keep it for later. Cut a slight angle on the other half.

It will look like this:


Now trim your patterned papers as follow:


  • 6 rectangles 6.5cm x 5cm
  • 2 rectangles 14.5 x 5cm
  • 3 rectangles 7.5cm x 5cm


Adhere each panels as indicated:

Front of the card (outside)


Back of the card (inside)


This is what the box card will look when it's closed.


Now take the strip of cardstock you had previously cut out, cut another one of the same size.  
Fold 2 flaps and adhere them inside the box


Now your box card is ready to be decorated with die cuts and embellishments:
I used this strip of acetate to adhere the hearts and die cut to the inside strips.


Hope you enjoyed my project!
Thanks for reading xoxo


Monday, 8 September 2014

Cinnamon Apple Chips

Hi all.  Hope you had a great weekend! Mine was fab. The weather here in Ireland is still fairly mild and I enjoyed a lovely walk with my teenage daughter on Sunday morning.  It's so nice to be able to spend quality time with her.  Love all those girly talks about everything and anything... 
We were trying to come up with an afternoon snack idea and decided to make something quite simple with ingredients we had in the fridge; so we settled for cinnamon apple chips.
I made them very often last winter and love the smell of cinnamon lingering in the house! It reminds me of Christmas: my favourite time of the year.


This is how I make them:

INGREDIENTS: (syn free)
1 serving

1 apple
ground cinnamon
frylight


METHOD:


  1. Slice the apple using a potato peeler and place the thin slices in a microwavable plate previously sprayed with Frylight. Make sure that the slices are spaced out.
  2. Sprinkle some ground cinnamon on them.
  3. Put in the microwave for about 8 mins.
  4. Place them in a wire rack to cool. 
  5. When cooled, serve them and enjoy! :-)


XOXO


Friday, 5 September 2014

Fakeaway Friday: Mushy pea curry

Hi all. Thank crunchy it's Friday! 

It has been a long week!! We survived our first week back to school but finding really hard to settle back into the routine. I really don't know where the time goes sometimes...my 13-year-old daughter has started 2nd year in Secondary school and my 10 year old son is now in 5th class!

Before I started Slimming World we used to get take away meals on Friday nights and eat it in front of the TV watching a nice movie. I used to look forward to a night off cooking after a full week of doing cleaning, washing, school runs and helping with homework.
Since I joined Slimming World in September 2013 however, I have been very conscious of what we eat and try to prepare healthy meals all the time (although I admit I do cheat once in a while...oops!) The main thing is I get back on track straight away; whenever I am tempted to have a bad meal I say to myself: "NO FOOD TASTES AS GOOD AS SKINNY FEELS"...

I love cooking and trying new recipes.  I sometimes get inspired by a recipe I have seen on a magazine or website, and sometimes I like to make my own recipe Slimming World friendly.
Tonight we were so tempted to order a Chinese dinner as a Friday night/back to school treat. It would have been so easy. Instead I decided to get into the kitchen and make a curry! Well done me!! (Round of applause).

Soon after I joined Slimming World last year, I heard talking about mushy pea curry. Well... I must admit it took me about 8 months before I found the courage to try it! Don't get me wrong, I love curries, but I can't stand mushy peas. I don't like their taste, texture and I am also put off by the smell. Yuck!
Surprisingly enough, not only I loved the mushy peas curry but even the kids seem to really enjoy it! It tastes as good as any takeaway and syn free on Extra Easy.

How things change in a year...we still have family nights and we all watch a movie together but we also enjoy a beautiful healthy meal!


Here is the recipe:

MUSHY PEAS CURRY

INGREDIENTS: (syn-free on Extra Easy)
Serves 4

For the sauce:

2 tins of mushy peas
1 tin of baked beans
1 tin of chopped tomatoes
2 tbsp curry powder (I like using the hot curry powder, but you can use the mild one if you prefer)


Add:

4 medium sized chicken breasts
2 medium sized green peppers
1 onion
2 garlic cloves


METHOD:


  1. Blend the mushy peas, baked beans, chopped tomatoes and curry powder and set aside.
  2. Dice up the chicken and vegetables, spray a pan with Frylight and cook till softened.
  3. Add the sauce and simmer till chicken is fully cooked.
  4. Serve with boiled rice or Slimming World chips.  


We can never agree whether to have it with chips or rice so I usually make a bit of both and everybody is happy!

After this lovely dinner it's time to put my feet up and enjoy a lovely glass of red wine.(175ml 6 syns)


HAPPY WEEKEND EVERYONE!!


TALK SOON,
 XOXO


Wednesday, 3 September 2014

Fairy Doors

I have been thinking of having a go at decorating fairy doors for quite a while. I finally decided to purchase a few unfinished ones on ebay and started to have fun with them. I am absolutely loving it! So cute and girly. Now I can't wait to decorate a few more...
They will make a great addition to my stock for the Christmas markets. Definitely something different.
I used acrylic paints, tiny ladybirds embellishments, charms and glitter to give them a bit of sparkle.
They make a perfect project for those rainy days...


Not too bad for a first attempt!!  xx

Monday, 1 September 2014

Bolognese Pasta sauce

What can I say ... I am Italian, and as a true Italian I love my pasta! I have to have it at least once a week and it's always a bit hit with my family.  
There are so many sauces you can serve your pasta with, but one of our favourites has to be with Bolognese sauce.  Here is how I make it Slimming World friendly:

INGREDIENTS: (syn free on Extra Easy)
Serves 4


350 gr extra lean mince
1 large onion
3 medium carrots
3 celery stalks
2 garlic cloves
1 tin of tomato purée
700 ml beef stock (made up with 2 stock cubes)


METHOD:

Dice the onion, carrots, celery and garlic.  Spray a large saucepan with Frylight and cook the vegetable till softened.


Stir in the extra lean mince meat and cook it for a few minutes till browned.


Stir in the tomato purée and the beef stock and let it simmer


About an hour later your sauce should look like this:


If you don't mind using a few syns and want to give your pasta that authentic Italian flavour you can add 175ml of red wine when you add the extra lean mince meat (6 syns. It works out at about 1.5 syns per serving).  

When the sauce is ready, boil your favourite pasta shape in salty water, drain and serve with your bolognese sauce.  If you like it,you can sprinkle some parmesan cheese (HEA)


Buon Appetito!